Static Electricity Activities

For Science Club we ventured into static electricity—some history, how it works, how to use it for tricks and games, and how it’s part of our lives. I would like to note that static electricity is finicky…it requires low humidity and clean hair. I recommend reminding the kids to wash their hair the night or morning before and also consider bringing a dehumidifier to class as the humidity rises with all the bodies in the room.

IMG_8479.jpg

Aluminum Can Race

How quickly can you get your aluminum can from the starting line to the finish line using only static electricity?

You’ll need empty and clean aluminum cans, balloons, a stopwatch, start & finish marks (just written on paper), and packing tape. Take the start and finish marks to the floor with packing tape.

Place your aluminum can just behind the start line. Have a partner use the stopwatch and let you know when to begin with a “ready, set, go”. Get your balloon charged by rubbing it on your hair. Use the balloon in front of the aluminum can to pull the can with static electricity, but don’t touch the can. Pull it across the finish line and stop the stopwatch. Try again if you’d like to improve your time. 

How it works: Rubbing the balloon on your hair transfers electrons from your hair to the balloon. Electrons have a negative charge, therefore the balloon is more negatively charged. When you place the balloon in front of the can, the electrons from the balloon are attracted to the positively charged protons in the can. Since the positive and negative charges are attracted to each other, you can use this attraction to pull the can.

IMG_8492.jpg

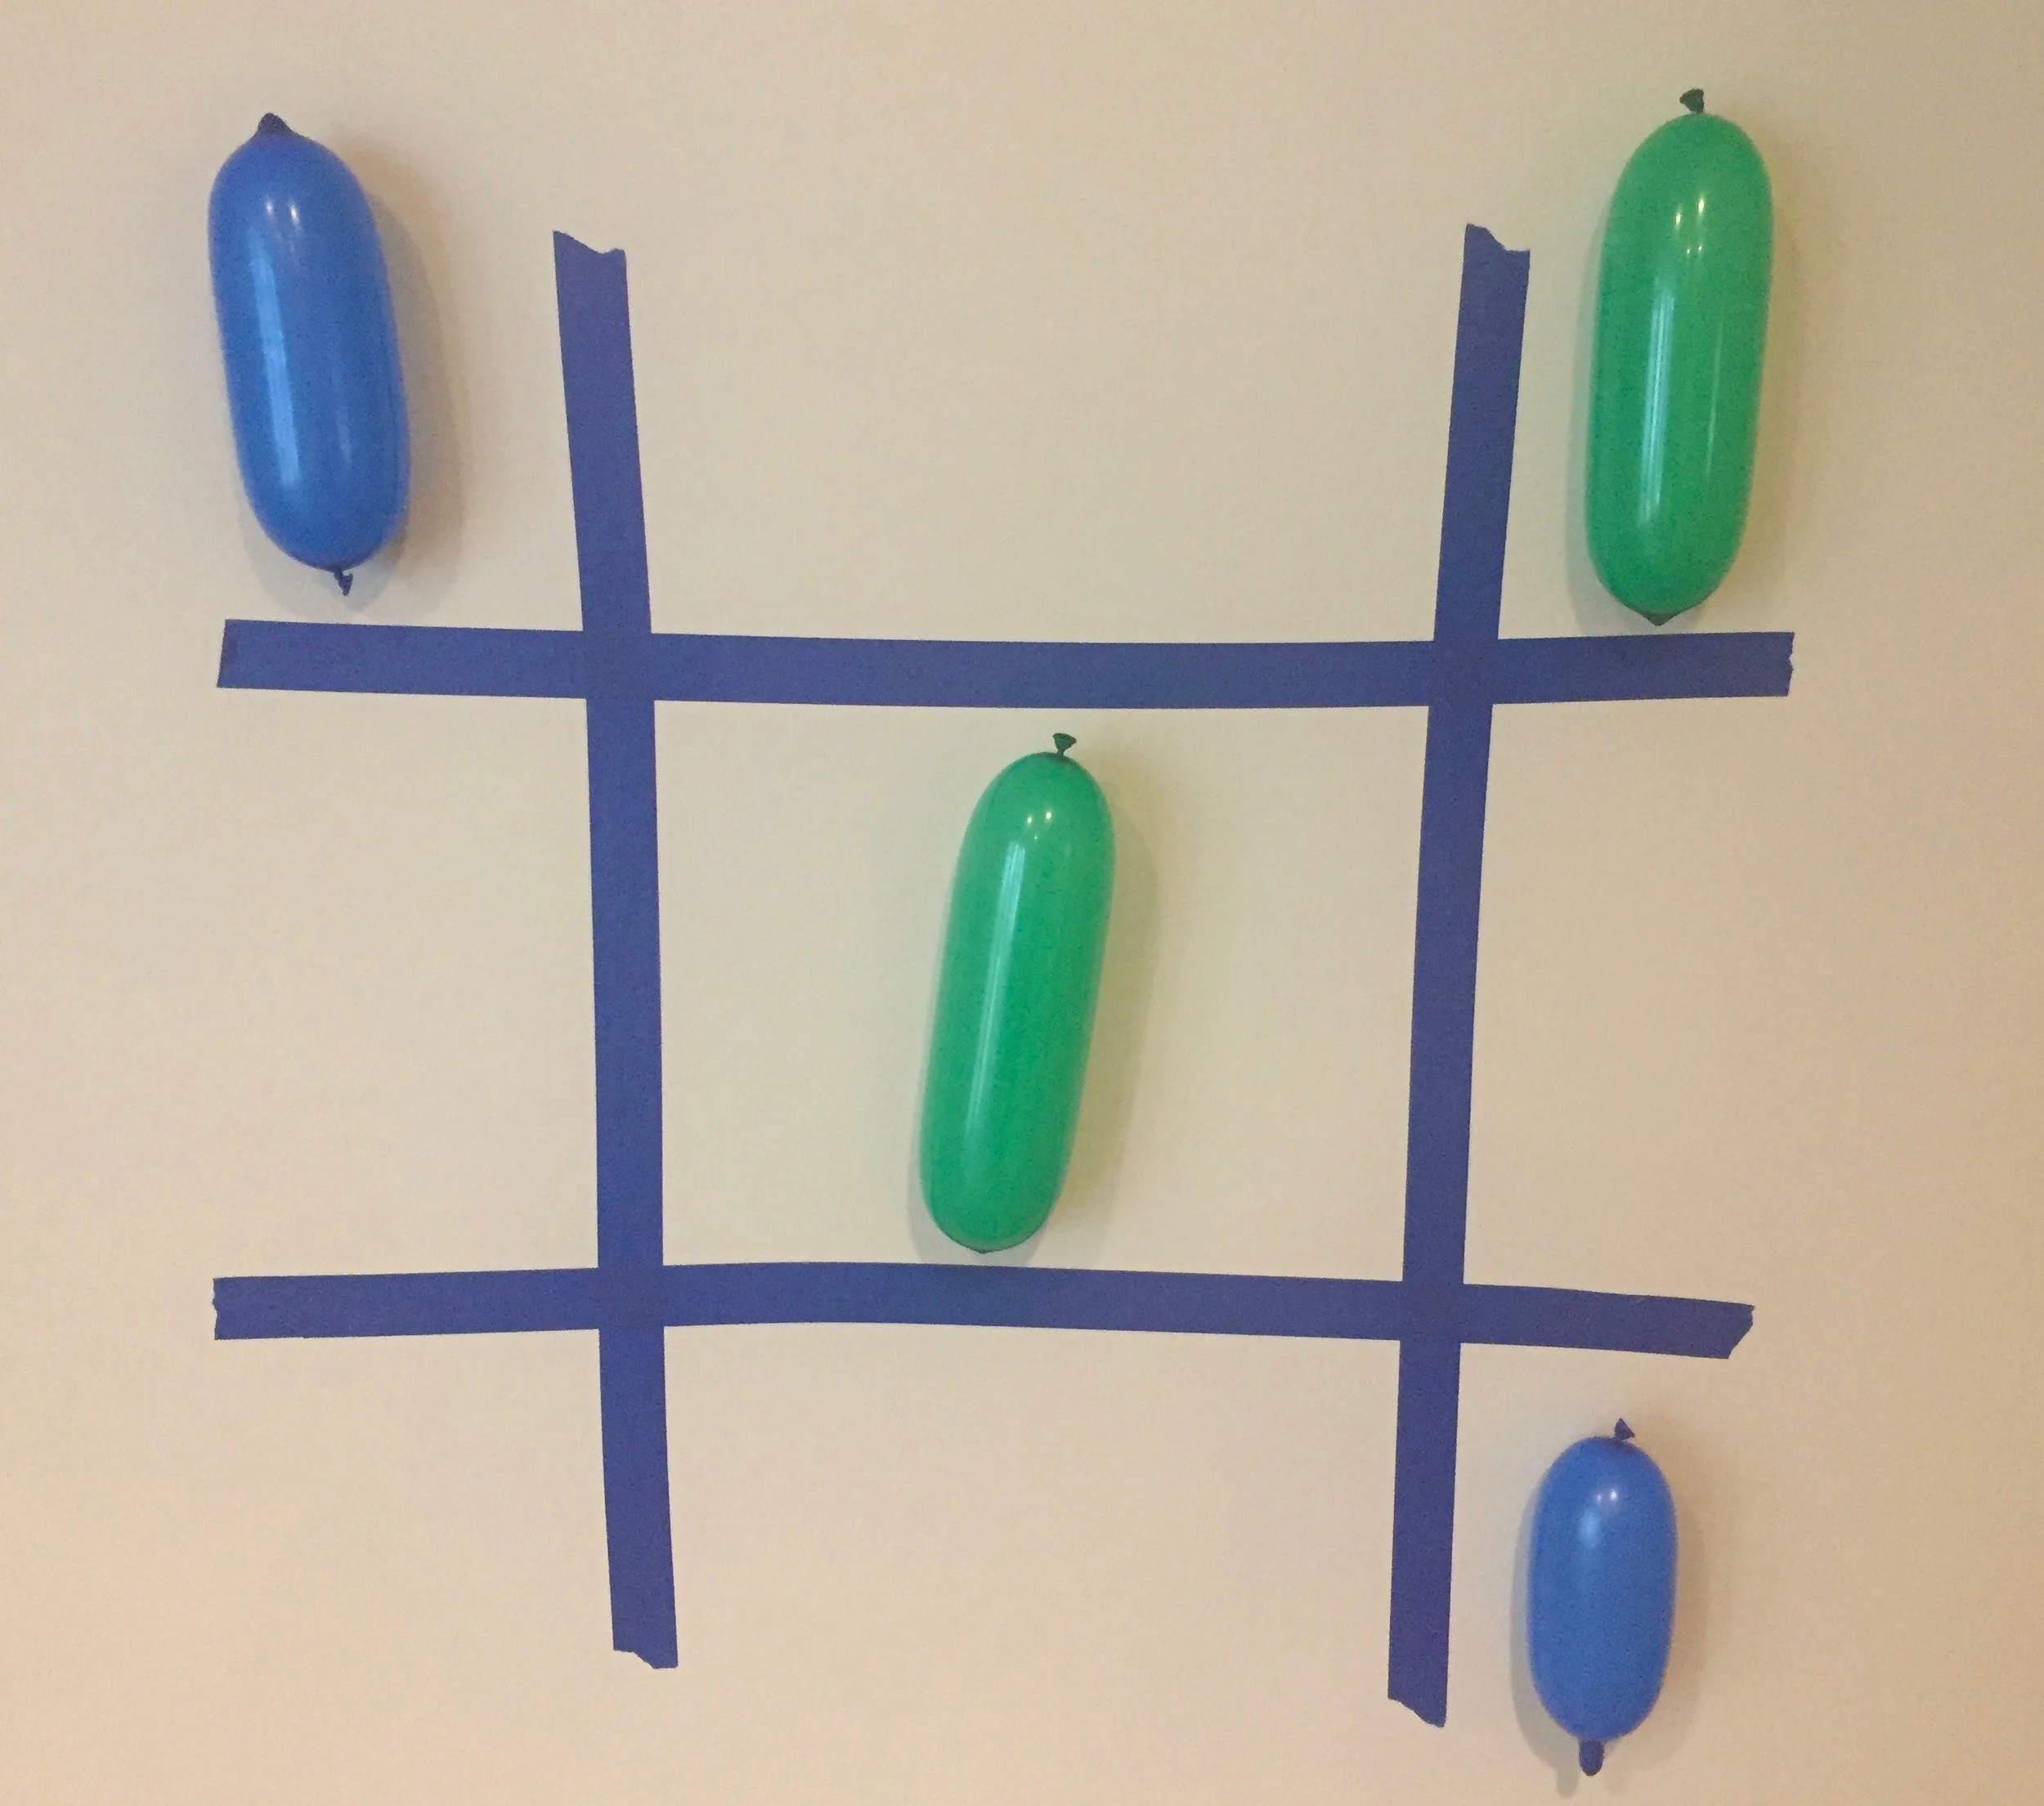
Balloon Tic Tac Toe

Play a game of Tic Tac Toe on the wall using static electricity. 

You’ll need 10 balloons (5 each of two different colors) and painter’s tape. Use the painter’s tape to create the Tic Tac Toe board on the wall.

Play this game with two players. Each player chooses a balloon color. On your turn, charge a balloon by rubbing it on your hair and sticking it to the wall on the Tic Tac Toe grid. The first player to get three in a row wins. 

How it works: Static electricity is produced on the balloon when you rub the balloon on your hair and transfer electrons from your hair to the balloon. Electrons have a negative charge, therefore the balloon is more negatively charged. When you place the balloon on the wall, the electrons from the balloon are attracted to the positively charged protons on the wall. Since the positive and negative charges are attracted to each other, you can use this attraction to hold the balloon to the wall. 

Screen Shot 2018-09-20 at 8.10.52 PM.png

Bubble Locomotion

Control and move your bubbles with static electricity.

You’ll need bubbles, bubble wands and/or straws, towels for clean-up, PVC pipe, and wool fabric (like an old sweater piece). I also used a clear tablecloth to protect the table.

Use the bubble wand or a clean straw to blow bubbles. Blow them into the air or directly onto the table. 

Charge the PVC pipe by rubbing it with the wool, and see what happens when you bring it near the balloons. Can you do any neat tricks with bubbles and static electricity? 

How it works: Static electricity is produced on the PVC pipe when you rub it on the wool because electrons are transferred from the wool to the pipe. Electrons have a negative charge, therefore the pipe is more negatively charged. When you place the pipe near the bubbles, the electrons from the pipe attract the positively charged protons in the bubbles, and you can control where your bubbles move. 

IMG_8666.jpg

Glow

Use static electricity to make a fluorescent bulb glow. 

You’ll need a dark space (we used a bathroom without a window). You’ll also need a balloon and a fluorescent bulb. We used two different types of fluorescent bulbs—compact fluorescent and the tube type.

*Keep in mind that fluorescent bulbs have mercury vapor in them, so be aware of clean-up procedures if one breaks.*

Go into a dark space. Hold the fluorescent bulb in one hand and the balloon in the other. Charge the balloon by rubbing it on your hair. Now bring the balloon near the bulb. What happens? Try touching the balloon to the bulb. Try rubbing the balloon quickly but gently up and down the bulb. What happens? 

How it works: The fluorescent bulb is filled with mercury vapor. When the bulb is in a light fixture and turned on, electrons collide with the mercury vapor, causing the vapor to emit uv light. The inside of the fluorescent bulb is coated with a material containing phosphors. When you shine uv light on phosphors, it emits visible light which is the light we see when the bulb lights.

When you rub a charged balloon near the light, you are stirring up the electrons in the mercury vapor which emits uv light, and the uv light causes the phosphors to emit visible light. 

IMG_8672.jpg

The Power of Amber

Observe amber’s “power of attraction” just like the Ancient Greeks. 

You’ll need a piece of amber and some tiny cut-up pieces of tissue. You’ll need carpet or a carpet-type rug.

Rub amber on the carpet to charge it. Hold it near a square of tissue. Touch it to the tissue. What happens to the amber and tissue? 

How it works: Amber is fossilized tree resin from an extinct type of pine tree. Amber, and it’s ability to attract small particles when rubbed with wool, was first described by the Greek philosopher Thales of Miletus in the 6th century B.C. We now know that amber is a material that readily accepts electrons from materials that readily give electrons when the two are rubbed together. These extra electrons on the amber give it a negative static charge. This charge is attracted to the positive charged part of the tissue. 

An interesting fact: The word "electron" in English comes from the Greek word for amber!

IMG_8481.JPG

Bending Water

Use static electricity to bend water, and fill a container. 

This is a variation of the common “bending water with static electricity activity”, but it’s a variation that could be used if you don’t have a faucet and sink. It’s also a little different because the goal is to get the water in the “fill here” container. It’s more fun this way!

You’ll need a cup with a hole in the bottom and a gallon jug of water as a faucet. You’ll need a large plastic bin as a sink to catch water. You’ll also need two small plastic containers labeled with permanent marker, one labeled “aim here” and the other labeled “fill here”. You’ll need a balloon. A towel is useful for spills or drying wet balloons. I placed modeling clay under the plastic containers to keep them in place—this is optional.

Cover the hole on the bottom of the plastic cup with a finger while filling it with water. Charge the balloon by rubbing it on your hair. Hold the cup over the container labeled “aim here”, and place the balloon above the container labeled “fill here”. Remove your finger from the hole so water streams into the “aim here” container. Now use the charged balloon to bend the stream of water toward the container labeled “fill here”. See if you can get more water in the “fill here” container by the time you run out of water in your cup. 

How it works: Static electricity is produced on the balloon when you rub it on your hair, transfering electrons from your hair to the balloon. Electrons have a negative charge, therefore the balloon is more negatively charged. When you place the balloon near the falling water, the electrons from the balloon attract the positively charged protons in the water. You can use this attraction to bend the stream of water. 

Science Club: Plants

This month for Science Club we explored plants. It sounds like a perfect theme for spring, but outside there isn't much coming to life yet. We managed with lots of seed activities, maple sugaring, a microscope, some store-bought flowers, and plant collages.

First, here's a link to the basic format for Science Club. It explains how we generally plan and run things. 

Described below are activities families brought for our theme. 

1432376359210.jpeg

Kids guessed which seeds would grow into which plants. There's a mini bag with seeds in it stapled behind the seed packets, so kids can check if they made a correct match. 

1432376357080.jpeg

Inside these boxes are pine cones, pine needles, and acorns for kids to feel and guess.

1432376365034.jpeg

Here's a display showing how we use flowers in herbal teas and for eating. 

1432376353394.jpeg

Going along with the herbal teas and edible flowers, here is a project where kids could use leaves and flower petals to color a fabric hanging. 

1395874395899.jpeg

We viewed prepared plant slides through a microscope. 

1432376362539.jpeg

Kids could observe bean sprouts and were welcomed to start their own in a plastic bag with a  paper towel. 

1432376357139.jpeg

We counted flower petals and learned about the mathematical patterns found throughout nature (called Fibonacci Numbers). 

1395874940051.jpeg

We learned about maple trees and how to make maple syrup (and what leaves and seeds are and aren't from maples shown in the pic above). We sampled maple syrup candy. 

1432376364805.jpeg

And finally, we had an art table where kids could make a plant collage. 

Science Club: The Human Body

This month for Science Club we explored the human body. 

First, here's a link to the basic format for Science Club. It explains how we generally plan and run things.

Described below are activities families brought for our theme. Most of the pics were taken at Science Club, but a few I took at home of the activities I brought. It's hard to focus on working with kids and taking pictures. I need to hand off my camera next time. 

science+club+skeleton+and+puzzle.jpg

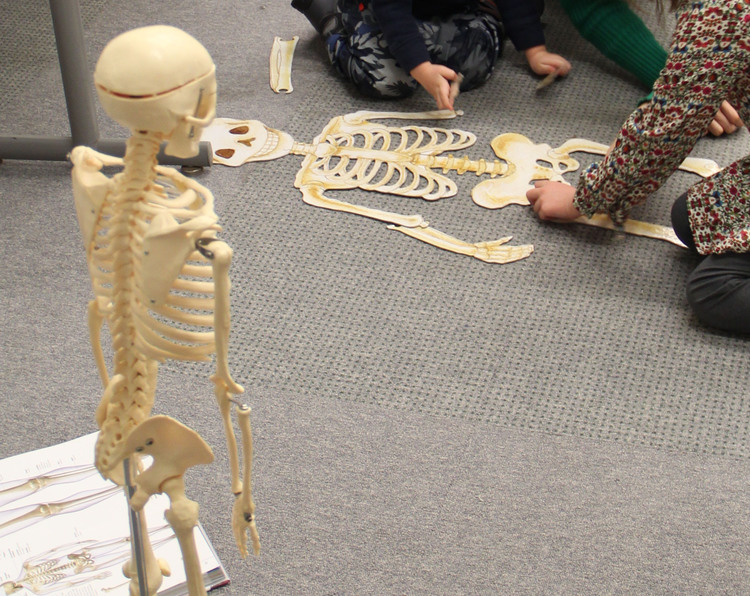
For the skeletal system we had a floor puzzle, skeleton model, The Human Body Book with a skeletal system page opened, and a light box with broken bone x-rays.

For the floor puzzle, kids liked putting it together, then lying next to it on the floor to see if they were taller or shorter. I like how the bones are labeled on the back of each puzzle piece. 

For the skeleton model, kids wanted to see how the skeleton arms & legs move.  

science+club+broken+bones+xrays.jpg

 I didn't see anyone use the Human Body Book page with the skeletal system. That's ok. It was available if anyone was interested. By the way, this is my favorite all-in-one human body book. It's a mammoth for little hands but a good one to page through together. 

The broken bone x-rays weren't taken much notice of. My plan was to let kids find breaks and fractures in the bones, then find those bones on the skeleton model.

The light box wasn't bright enough for the light room. If we would have turned off the lights and made a special time of it, that would have gotten their attention. The room didn't have windows, so that would have worked. The light box is just a clear container with white lights inside. There's a piece of white paper taped to the lid so the individual lights aren't as noticeable. It works great in a darkened room. 

science+club+play+dough+organs.jpg

For this area, we shaped play dough into organs. One of the kids ran up to his mom to show the pancreas he made! Wish I got a picture of that.

For logistics, we covered the floor with a clear table cloth. The play dough is a homemade recipe. The organ cards are an inexpensive printable. The book is Organs! How They Work, Fall Apart, and Can Be Replaced (Gasp!). I like the illustrations because they're simplified which makes them easier for little ones to see the parts. It's also been helpful for my sketches of the organs. 

science+club+stomach+acid.jpg

Here kids learned about digestion. They were given a handful of cereal and squished it in their hands to represent how our teeth chew food. They put the cereal down the toilet paper roll, representing the esophagus, and it fell into the bag filled with vinegar, representing the stomach and stomach acid. They learned how long food is typically in the stomach, and small and large intestines. 

science+club+blood+model.jpg

For the circulatory system, each child made a model of blood and got to take it home.

The plasma is water with yellow food coloring, the red blood cells are Red Hots candy, the white blood cells are uncooked lima beans, and the platelets are uncooked rice. I can't find the original post where I got the idea for the candy, beans, and rice. I remember one site suggested adding bacteria so the white blood cells could attack. I like that idea but not at the library. 

The jars are spice jars from Penzey's. I used white address labels to write the blood contents on the side. I wanted something the kids could take home and think about later. The only thing I'd do differently is use something red other than Red Hots. They work for the demonstration, and I like how they dye the water red, but I'd prefer something that would last at least a week to keep referring back to. 

science+club+stethoscope.jpg

Kids listened to their heart beats. I have a nurse friend who let me borrow two stethoscopes. The kids' faces lit up when they heard their own heart beating; it was so sweet.

As far as logistics, we used alcohol wipes between uses to keep the ear pieces clean. And because of the room noise, we went into a quieter side room for this. If a child had a hard time hearing their heart, I had them do some jumping jacks. 

Science Club: Electricity

This month for Science Club we tackled electricity. Everyone was a bit nervous about what activity to bring. They said things like, "I don't understand electricity myself." "I'm afraid I won't be able to explain it well." and "I need to ask my husband for ideas." After much hard work and research, we came up with some exciting activities. And we all, even the adults, learned more about electricity through this challenge. 

First, here's a link to the basic format for Science Club. It explains how we generally plan and run things.

Described below are the activities families brought for our electricity theme. 

homopolar+motor.jpg

One family brought a homopolar motor. It's where a piece of copper metal moves because of the opposite charges between the electricity moving through the wire and the neodymium magnet. Watch this youtube video to see it in action. It's mesmerizing. 

electrostatic+pop+tab.jpg

Here's an electrostatic demonstration where static electricity from the television moves the pop tab between the pop cans, making a clinking noise. The kids try to figure out how it starts and stops by grounding a wire and turning the television on and off. Here's a youtube video that shows it in action with a good written description as well.

potato+clock.jpg

Here, a family brought a Potato Clock Kit to show how a potato or lemon can power a clock. It's a great introduction to how batteries work. 

conductor+or+insulator+activity.jpg

Here's an activity where kids learn about conductors and insulators. There is a circuit with a light bulb in one box. The kids take items from the other box and use alligator clips to clip them to the circuit. If the bulb lights, they have a conductor. If it doesn't, they have an insulator. 

battery+testing+station.jpg

This is a battery testing station. Many kids have used a battery tester before, but they enjoyed the challenge of sorting. We also discussed the positive and negative sides of a battery. Inside the binder is a diagram and explanation of how batteries work. 

flashlight+activity.jpg

For this flashlight activity, kids could investigate the flashlight that is taken apart and see if they could get the bulb to light. We talked about completing the circuit and how the switch works. The wires and battery are taped and rubber banded to keep everything except the bulb together. 

Next, there was a magnetism activity, which I only got a worthless blurry picture for. Kids could determine which items were magnetic, and they learned how magnets work. Magnetism & electricity go hand-in-hand with electromagnetism and motors, so this was a great foundational activity. 

After everyone made their rounds with the electricity activities, I sat down with each family individually to let them try our Snap Circuits set. I didn't have them follow a set of directions. I just asked the kids what they wanted to power (a fan, a light, or a buzzer) and then how they wanted to power it (a rechargeable battery or a hand crank). After walking them through creating their circuit, I asked if they'd like to add a switch. So, it was kind of basic, but all the kids got a chance to make a circuit work. 

Science Club

Our homeschool group meets monthly for Science Club. Here's how it works in case you're starting your own club.

conductor+or+insulator.jpg

The goal of Science Club is to get kids exposed to science topics through hands-on exploratory activities. There isn't formal teaching. Kids just explore each activity and move on when they're ready. 

For some families, Science Club is the culmination of a science unit, and for others, it's the beginning of a unit. It's helpful for parents because each family is only doing research and organizing one activity. This saves time and money and allows families to focus on what they're interested in or good at. 

Our Science Club is mainly for elementary-aged kids.  Older kids can help or teach.  Younger kids are welcome, but parents may want to bring an extra activity appropriate for them and must be mindful of choking hazards.

science+club+the+human+body.jpg

How it works:

-We share information about Science Club on our homeschool Facebook group as a monthly event. For each event the description tells this month's science topic and the general Science Club description for those new to the Club. It also tells which library we'll be meeting at. 

-Science Club is free. Here's how. First, our library doesn't charge us to use the space as long as we don't charge for Science Club. Second, all families bring a learning activity.  Because everyone is doing some work, there's no need to pay one teacher for their time. 

-For each Science Club meet-up, all families bring an activity(s) for the theme. For example, families could bring a selection of recommended books, an experiment, a model, a coloring activity or art project, a game, or even a display of something their family did at home.

-The activities are set around the room, some at tables and some on the floor. The adults decide if they'd like to stay with the activities, walk around with their kids, or a mixture of both. If a parent decided not to stay with their activity, they made a sign describing what could be done at the activity. The kids/families rotate around the room clock-wise to explore each activity at their own pace.

-Each month a different family chooses the Science Club theme. I talk with the family at the end of Science Club and ask the kids for their ideas. Sometimes I need to steer the theme a bit. For example a child suggested we study air. I associated air with the atmosphere and our lungs. She got excited about studying lungs. So I suggested we make our theme the human body, and she could learn about air and our lungs. Everyone's happy, and we have a theme the whole group can work with. 

Update July 2018: Things we learned and might try differently: 

I led this Science Club for about a year. During this time we definitely got good at making signs explaining what to do at each activity. Kids and parents had amazing enthusiasm to share what they brought and came up with really interesting activities. I think the hardest thing was for families to balance the desire to teach or share their activity and to be together exploring the activities. If I were to rework a Science Club, I would focus more on this problem. Perhaps we would somehow schedule a good mixture of direct teaching/sharing and independent activities.